Beautiful algorithms used in a compiler and a stack based virtual machine ~Part 1. Design of the Monkey compiler~
Photo by Chad Montano on Unsplash
This is the December 5 article for Wantedly 2021 Advent Calendar.
Knowing something which is hidden under a veil of an abstraction is fun. Even though I do programming every day for a living, I was not really familiar with how the code was executed under the hood. That motivated me to write my own compiler by following the two excellent books "Writing an interpreter in Go" and "Writing a compiler in Go" by Thorsten Ball. In these wonderful books, the author (who is also wonderful) explains how to implement a compiler of an original programming language named Monkey only with standard packages in Go. The specification of the Monkey language is explained in this page.
In this series of posts, I would share algorithms, which I found interesting while implementing the Monkey compiler. For readers who would like to see my completed compiler, please take a look at my github repository kudojp/MonkeyCompiler-Golang2021.
Target readers
This series is for readers with the basic knowledge of the typical design of compilers. If you are not familiar, reading Introduction of Compiler Design(GeeksForGeeks) would be a good kick off.
The whole picture of this series
This series is composed of five posts. The first post (this post) is the introductory one. In each of the 2nd to 4th, I would pick one algorithm, which is used in the Monkey compiler. Please note that Monkey uses not a register machine VM, but a stack machine VM. Thus, algorithms described in the 2nd to 4th posts are not applicable to register machine VMs. In the 5th post, I would cover the difference between a stack based VM and a register based VM.
- Part 1. Design of the Monkey compiler (this post)
- Part 2. How a pratt parser in Moneky compiler works
- Part 3. How to compile global bindings
- Part 4. How to compile functions
- Part 5. Part 5. What Monkey does not have, but Java has
This is how we go in this series. That being said, I would like to begin the 1st part.
Design of the Monkey compiler
I explain the design of the Monkey compiler in this post. This part is necessary because the definition of a word "compiler" is obscure and there exists multiple designs on it.
In terms of the word definition, the compiler I have built is the one which emits the bytecode, which is then executed in a VM. I implemented both of the compiler and the VM. And in terms of the design, the most notable thing is that the VM of Monkey is stack based. The primary interaction is moving short-lived temporary values to and from its stack.
Below, I describe the steps taken in the compiler and the VM to share the overview of the design more clearly.
Step 1. Tokenizing in Compiler
The first step in the compiler is tokenizing literals, identifiers (variable names), reserved words, and symbols in the source code to generate the slice of Tokens. Each Token contains information on its type and literal. This could be used to better track down lexing and parsing errors.
The example is below.
// Input: Source code in Monkey
// This is in the global scope.
let two = 2;
let three = 3;
two + three;
Source code above in Monkey would be tokenized into the slice of Tokens.
// Output: a slice of Tokens with types and literals
[]Token{
    {token.LET, "let"},
    {token.IDENT, "two"},
    {token.ASSIGN, "="},
    {token.INT, "2"},
    {token.SEMICOLON, ";"},

    {token.LET, "let"},
    {token.IDENT, "three"},
    {token.ASSIGN, "="},
    {token.INT, "3"},
    {token.SEMICOLON, ";"},

    {token.IDENT, "two"},
    {token.PLUS, "+"},
    {token.IDENT, "three"},
    {token.SEMICOLON, ";"},
}
Step 2. Parsing in Compiler
The second step is to parse the slice of Tokens, generated in the previous step, into the abstract syntax tree (AST).
Monkey uses the recursive descent parsing amongst many parsing strategies. In particular, its parser is categorized into a Pratt parser, which is an improved recursive descent parser that associates semantics with tokens instead of grammar rules[1]. Algorithm used in this parser would be explained in the part 2 of this series in more details.
In this post, only an example of its input and output would be shown.
// Input: slice of Tokens
[]Token{
    {token.LET, "let"},
    {token.IDENT, "two"},
    {token.ASSIGN, "="},
    {token.INT, "2"},
    {token.SEMICOLON, ";"},

    {token.LET, "let"},
    {token.IDENT, "three"},
    {token.ASSIGN, "="},
    {token.INT, "3"},
    {token.SEMICOLON, ";"},

    {token.IDENT, "two"},
    {token.PLUS, "+"},
    {token.IDENT, "three"},
    {token.SEMICOLON, ";"},
}
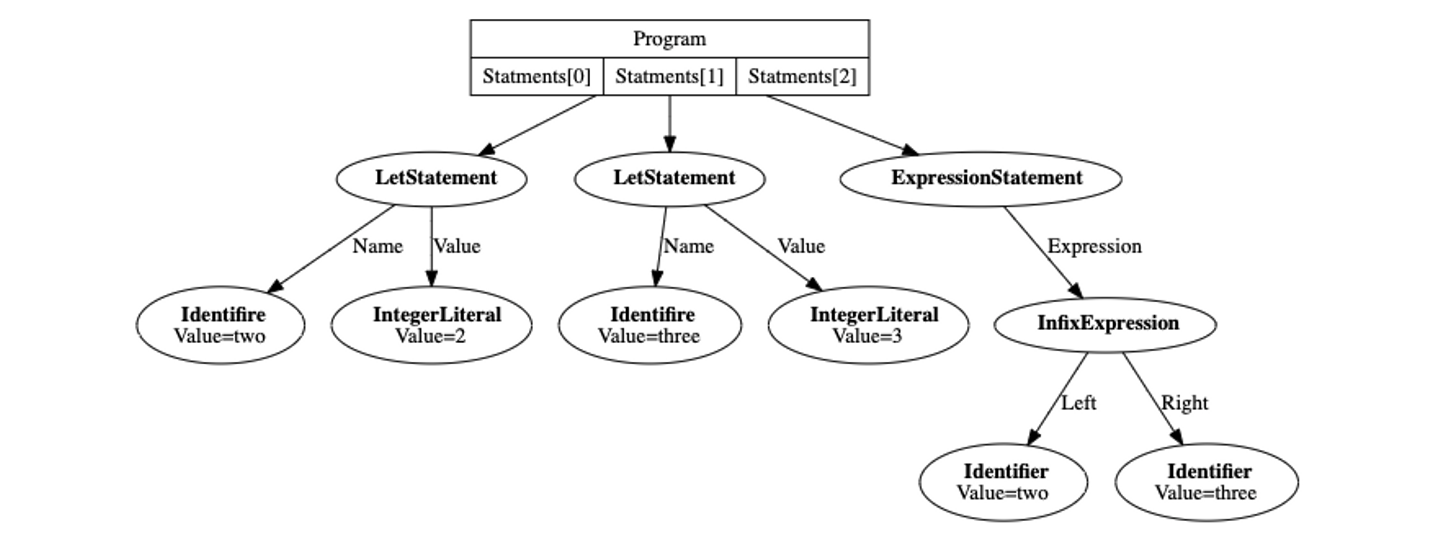
Slice of tokens above would be parsed into a tree structure, which is described as below. Each node of the tree implements Node interface.

⬆️Drawn with GraphViz
Step 3. Emitting Bytecode from Compiler
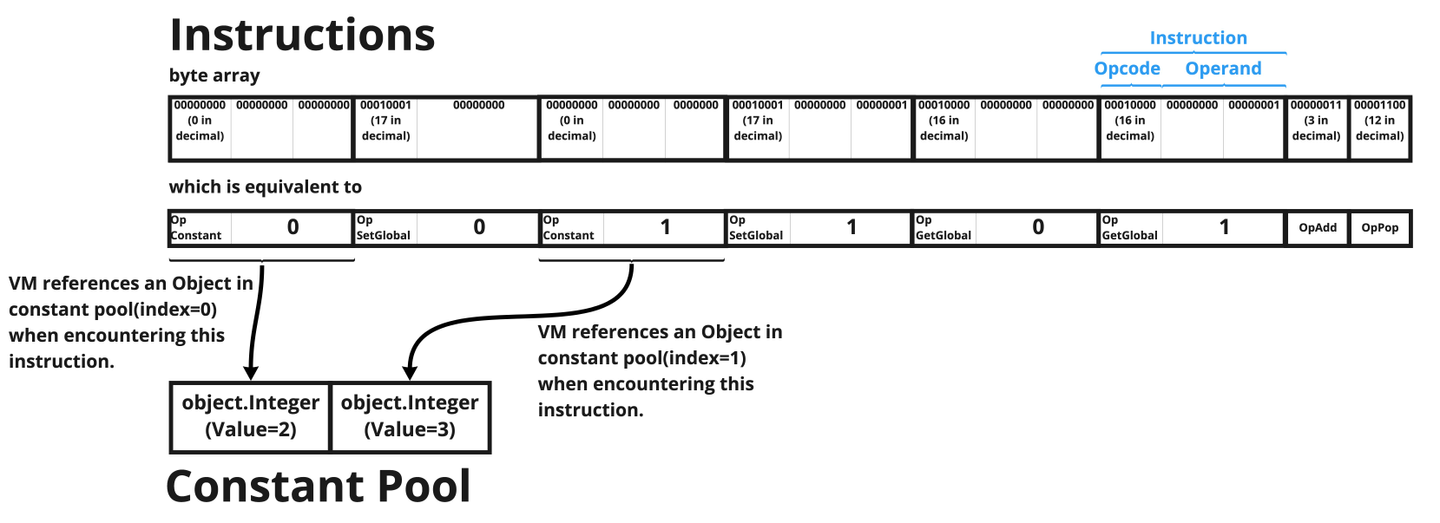
The third step is to generate the Bytecode from AST, which is generated in the previous step. Bytecode consists of the instructions and the constant pool.
The instructions is a byte array which is a sequence of instructions, each of which is equivalent to one-byte opcode and optional one or multiple operands. The constant pool stores Objects which are equivalent to values defined as a literal in the global scope. When the VM encounters an OpConstant instruction, the VM references [an Object which is at the index the operand in the instruction represents] in the constant pool.
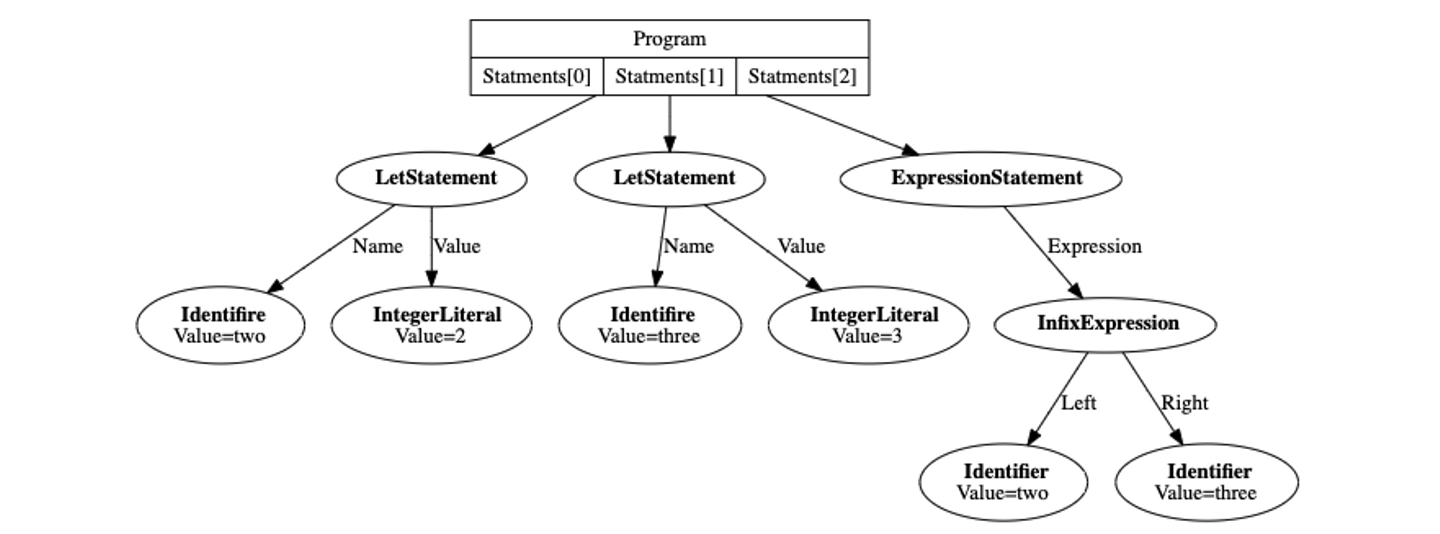
I would show you an example. Assuming that the AST below is given to the compiler,

the compiler emits bytecode below.

Notice that the identifiers (variable names i.e. two and three) no longer appear in the bytecode. In the VM, all Objects which are bound to variables are put in the store (which is a 1D array) in the VM, and they are fetched by specifying the index in the store. Please note that [mapping from variable name to the index in the store] is done in the compiler, while the store is held in the VM. This approach would be explained thoroughly in part 3 and part 4.
Step 4. Execute Bytecode in VM
The final step is to read the bytecode generated in the previous step and execute it. Please note that the VM in Monkey is also written in Go.
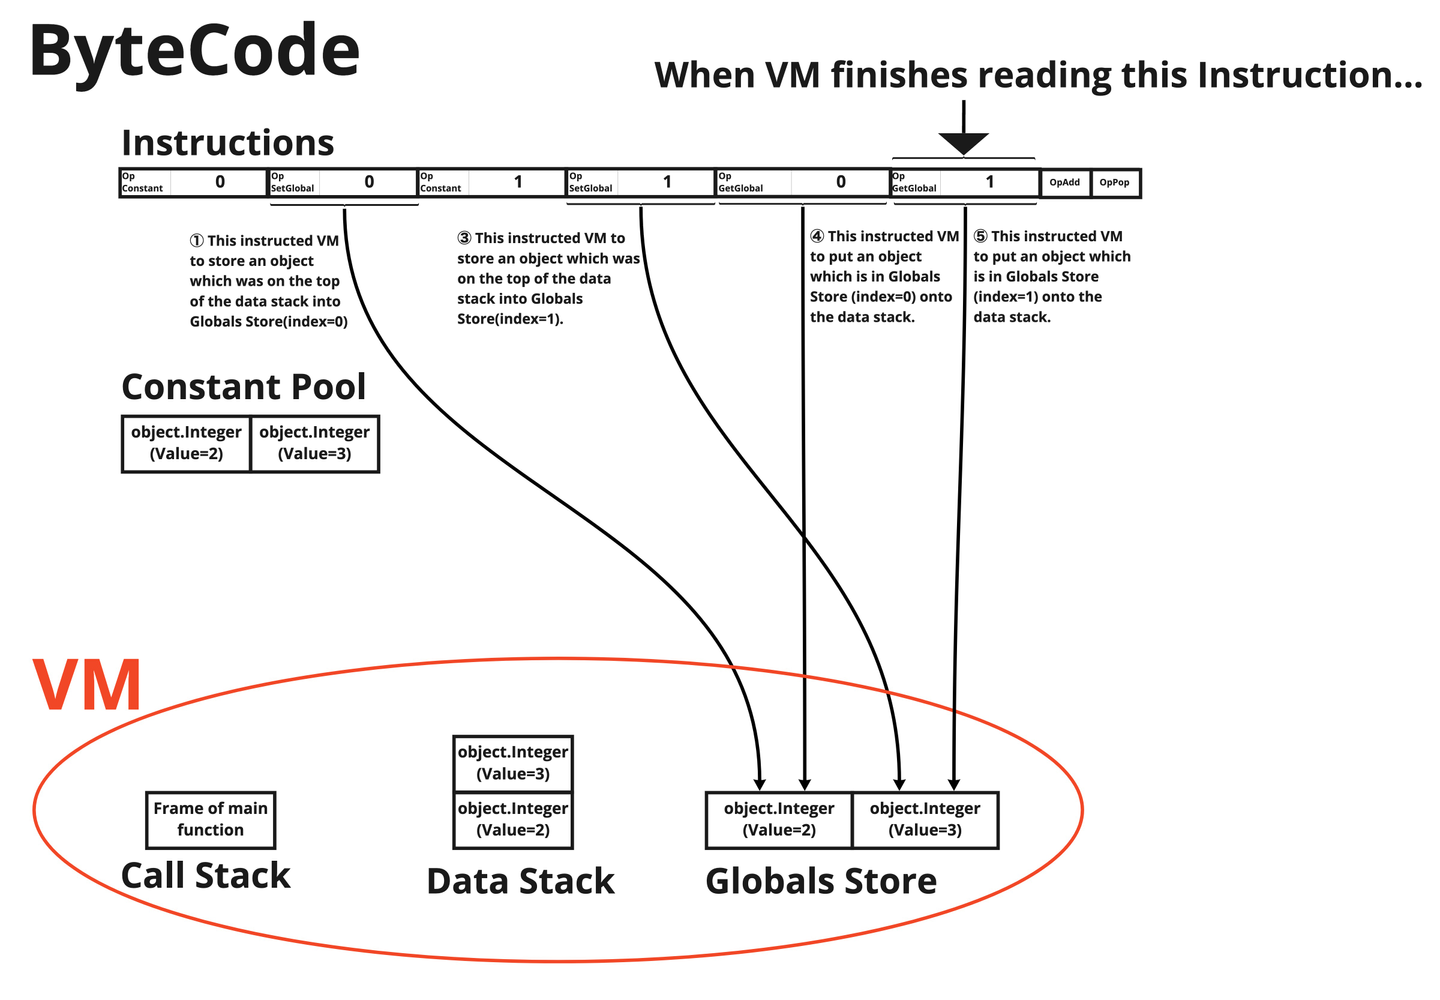
VM holds some data structures which are used during the execution. The VM in Monkey holds two stacks (data stack and call stack) and one slice (globals store).
The data stack is where intermidiate results, which are used for operations in VM, are preserved. They are preserved as Objects, and popped out when they are needed in the operations or when they would not be used any more.
The call stack is where Frames are pushed every time a new function is called. Each frame holds instructions of its function, an instruction pointer, which indicates the next index to be executed in the instructions, and a base pointer which is used to mark the base index of the current call in the data stack.
The globals store holds Objects which are bound to variables in the global scope. Every scope has its own store and the global store is the one where variables in the global scope are stored. For storing those in the local scopes, bottom cells used by the current call in the data stack are used. This is because local variables are referenced only in its scope, while the globals store has to be referenced in all scopes.
I would show an exmple of how input bytecode is executed in the VM.

This bytecode would be executed in the VM in this way.
- ⓪ By reading OpConstant 0 instruction, the VM copies the reference of object.Integer(Value=2) in the constant pool(index=0) and pushes it on the data stack.
- ① By reading OpSetGlobal 0 instruction, the VM pops the top element, which is the pointer to object.Integer(Value=2), from the data stack and puts it in the globals store(index=0).
- ② By reading OpConstant 1 instruction, the VM copies the reference of object.Integer(Value=3) in the constant pool(index=1) and pushes it on the data stack.
- ③By reading OpSetGlobal 1 instruction, the VM pops the top element, which is the pointer to object.Integer(Value=3), from the data stack and puts it in the globals store(index=1).
- ④ By reading OpGetGlobal 0 instruction, the VM pushes instruction object.Integer(Value=2) which is put in globals store(index=0) and pushes it on the data stack.
- ⑤ By reading OpGetGlobal 0 instruction, the VM pushes instruction object.Integer(Value=3) which is put in globals store(index=1) and pushes it on the data stack.
- ⑥ By reading OpAdd instruction, the VM pops out two references of objects from the data stack and put the result of additional operation, which is object.Integer(Value=5), onto the data stack.
- ⑦ By reading OpPop instruction, the VM pops out a reference of object.Integer(Value=5) from the stack for cleaning up purpose.
These are how Monkey executes the source code. In the compiler, it tokenizes, parses, and emits bytecode. The VM executes the bytecode.
Summary
In this post, I described the design of the Monkey compiler. This is just an introduction to align our premises, before I explain the algorithms in the 2nd to 4th posts.
References
[1] Wikipedia "Operator-precedence parser" https://en.wikipedia.org/wiki/Operator-precedence_parser#Pratt_parsing


